

There is no surprise that more and more people are attempting their own DIY porcelain floor tiles installations, given the seemingly endless stream of television shows dedicated to home buying, decorating, and remodeling that are currently on the air. And it’s not difficult to understand why porcelain floor tiles are one of the most popular surfaces available on the market right now. Indeed, it comes in a variety of sizes, colors, textures, and patterns that cover the entire design spectrum from traditional to contemporary and everything in between.
Porcelain floor tiles, which are equally essential, are attractive, inexpensive, durable, simple to clean, and almost completely maintenance-free! Because of this, it is ideal for a variety of projects such as floors, countertops, accent walls, showers, backsplashes, and many others.
Floor tiles are no longer restricted to the kitchen and bathroom; with its contemporary designs and sumptuous patterns, porcelain is equally at home in foyers and elegant living rooms. You should follow this expert installer’s advice if you want to perform your next porcelain floor tiles job yourself in order to avoid making typical (and sometimes expensive) floor tiles installation blunders.
Pro Tip #1: Make sure your floors are level and that your underlayment is correctly prepared to save time and hassle.
Living in an older house or condo means that you can pretty much count on finding flooring that isn’t precisely level and walls that aren’t completely plumb at some point. Make sure to take care of these issues before you begin installing your porcelain floor tiles, or you may end up putting the whole job at risk.
For example, in this sun-drenched space, an uneven floor and improperly prepared underlayment could cause these large, beautiful Silt Capella Porcelain Floor tiles to become uneven, posing a trip hazard to those walking on them. As an added precaution, since many walls aren’t perfectly level, you should always begin putting wall tile in the middle of the room and work your way outward. This will guarantee that the completed product maintains the integrity of the pattern that you wanted to use.
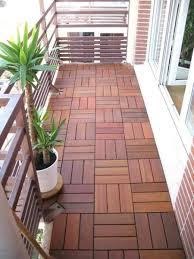
Pro Tip #2: Before you begin installing the floor tiles, make sure it is completely laid out in your area.
This provides you with the opportunity to experiment with a variety of patterns and determine which layout direction best complements both the overall space and the floor tiles pattern in question. In expansive settings where active kitchens flow into relaxing living spaces, porcelain floor tiles are a great choice for the floors and walls. Also, while deciding which floor tiles are ideal for the kitchen, be sure to choose one that is simple to clean and that is slip-resistant when wet when you are making your decision. These matte-finished big format porcelain tiles serve as the focal point of this contemporary area, bringing the room’s contemporary style together.
Pro Tip #3: Spread thin-set evenly throughout the surface and be sure you use plenty of it.
The aesthetic of reclaimed wood is one of the biggest trends right now, and this earthy and warm living area is a great example of that. Our Copper Vintage Wood Look Porcelain Floor tiles have a design evocative of reclaimed hardwood boards, right down to the saw-hewn texture, which gives it a depth of character that cannot be ignored.
A tragedy would be to have floor tiles pop up or break after all of the effort and money that has gone into this installation, and unfortunately, this is precisely what may happen if not enough thin-set is put equally throughout. Please take your time. Make use of a level as you go, and if you’ve done a good job of preparing your underlayment, there shouldn’t be any surprises. Visit http://diy-home.info/some-uncommon-ways-to-vet-floor-tiles/ to read about Some uncommon ways to vet floor tiles.
Pro-Tip #4: Take your time with the curing process.
After you’ve completed the installation of your lovely floor, it’s tempting to just tiptoe across the room to enjoy your accomplishment. Refrain from giving in to the temptation! Thinset requires time to cure (usually 24 hours or more); stepping on it too quickly can cause the tiles to move, resulting in the pattern being ruined. The lifelike veining gives this tile its unique personality, and even a single slid porcelain floor tile would spoil the whole impression of the design.
The warm tones and strong oak veins of this tile are the ideal complements to the towering white walls in this space. They provide much-needed natural texture to the room, which helps to warm it up. Once the floor has dried fully, you will have plenty of time to appreciate your hard work and creativity. You only need to be patient and follow the recommendations to ensure that your thin-set and grout are properly cured…
Pro Tip #5: Make a plan for entrances, outlets, windows, and lighting before you start building.
Until now, we’ve just spoken about porcelain floor tiles installation on floors, but now it’s time to talk about porcelain floor tiles installed on walls as well. Porcelain floor tiles are utilized on both the floor and the walls of this delightful bathroom, which has exquisite Tiles and Bath co Floor tiles. This kind of construction requires meticulous attention to detail in order to ensure that the joints and grout lines are perfectly aligned from floor to ceiling.
Naturally, there will be difficulties along the way, as you could anticipate. It is quite easy to get disoriented by a toilet, recessed walls, or other fixtures in a room. In contrast to a large living area with infinite rows of uncut tiles, a small bathroom requires additional time, patience, and a great deal of planning and preparation in advance to ensure a successful tiling job.
Ceramic floor tiles installation is an art, and it takes a lot of experience to become proficient. However, this does not rule out the possibility of achieving professional-looking outcomes on a budget. Remember to follow our five porcelain floor tiles installation instructions to help ensure the success of your job.
Comments are closed